Guided Tutorial
The following tutorial will guide you through the process of adding authentication features to a Vue application that uses a Node.js/Express backend.
Architecture Overview#
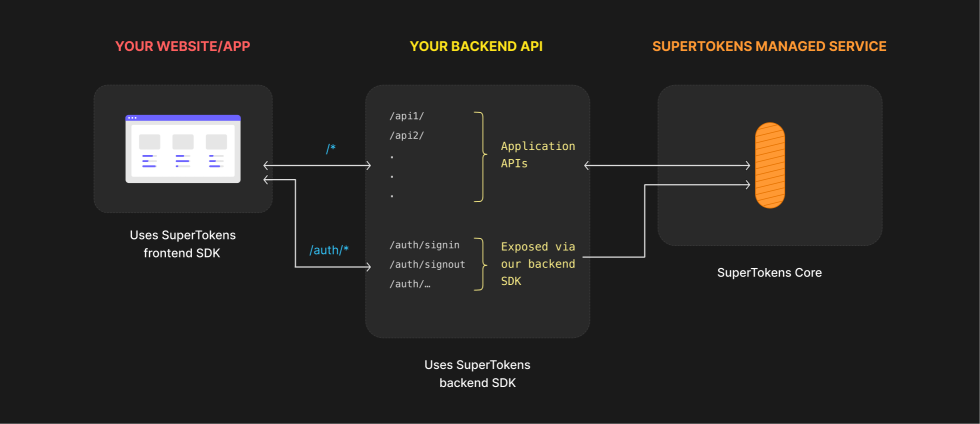
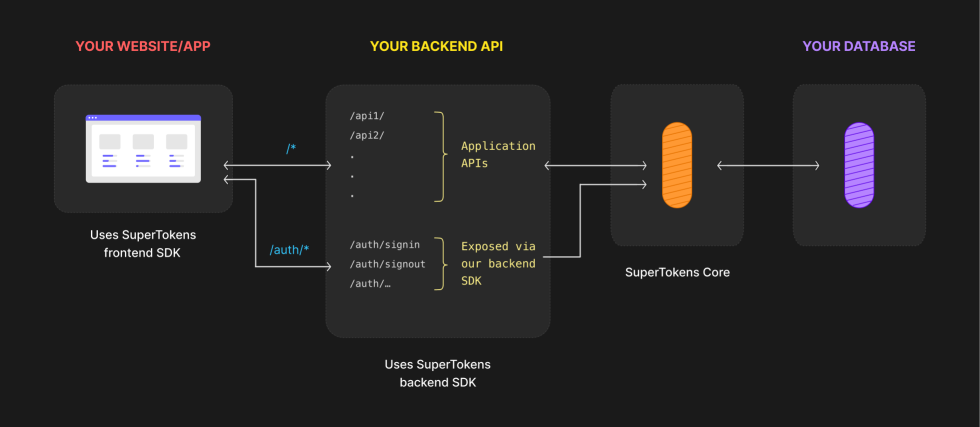
First, let's get a high-level overview of how everything is supposed to work.
- Managed service
- Self hosted


You can directly integrate SuperTokens in your existing services. The authentication routes will be properly exposed based on your configuration.
There are three main components that you need to keep in mind here:
- The Frontend SDK - Provides pre built UI components and functions to manage authentication from your frontend app.
- The Backend SDK - Comunicates with the Core Service and exposes all the auth related APIs for your frontend to call. It also enables session management and access control for your application.
- The SuperTokens Core Service - This is where we persist the state of the authentication functionalities. The service gets called by the backend SDK throughout every exposed feature. You can choose between self hosting the SuperTokens Core Service or using our managed offering.
For more information on how everything works, please check the following page.
Project Structure#
Use our starter project to get up and running quickly. It comes with full config examples based on your selection. Just run the following command to install everything:
npx create-supertokens-app@latest --recipe=emailpassword --frontend=vue --backend=node
The project that you just downloaded is split into two parts:
/backend#
This folder includes a sample server that exposes the authentication routes.
There are two files included in this project.
config.ts#
As the name suggests, this file configures the SuperTokens SDK and the features that your instance will use. In it, you will find examples for the following setup steps:
- Connecting to the SuperTokens Core Service. The value is set to
https://try.supertokens.com. This is a demo server we host so you can get started quickly. Later on in the guide, we will spin up a dedicated managed or self hosted core service, and, based on that, we will updated the URL. - Specifying details about your application. The information configured works for the demo app, but you will likely want to change it based on your setup. You can learn more about this config here.
- Selecting and initialising the authentication recipes that you need. Think of recipes as modules or features you enable. The list of recipes that are enabled here will affect which APIs are exposed via the Backend SDK middleware. Based on your use case, you may have to modify the parameters values provided to the recipes. We will go into detail about each recipe in the next sections.
index.ts#
This file initializes a simple Express server that makes use of two functions to expose the auth functionalities:
middleware: This adds the authentication routes to the Express ApperrorHandler: This manages the errors that can be thrown in the authentication flows and includes standardized responses
There are also examples on how to configure CORS, and how to use our session verification middleware to protect your endpoints. The endpoints in this file are just example ones and don't need to be added to your backend.
important
The order in which each function is called matters. You need to add the CORS config first, then the SuperTokens middleware and after that the rest of the routes that you have in your project.
/frontend#
config.ts#
Here we configure the SuperTokens SDK and the features that your instance will use. There are two functions exported by this file:
initSuperTokensWebJS: Initializes thesupertokens-web-jsSDK which exposes session management related functions to your components.initSuperTokensNodeJS: Initializes the prebuilt UI bundle that will be used to render the authentication pages.
You will have to update the appInfo sections based on your existing app setup.
Besides that you will also have to change the configuration options for each specific authentication recipe. But we will get into more specific on this details in the next sections.
/views/AuthView.vue#
The authentication UI gets initialized and rendered by this component.
In the loadScript function, we provide the SuperTokens config for the UI.
/router/index.ts#
In here we update the Vue router so that all the auth related requests load the AuthView component.
/views/HomeView.vue#
Check this file for examples on how to work with authentication session data.
/main.ts#
We initialize the SuperTokens SDK at the root of the application. This way we make sure that we have everything ready
once the entire javascript bundle finishes loading.
Recipes#
Recipes are the building blocks that you can use to enable different authentication functionalities. In this section we will talk about specific configuration options and guide you through how to manage different login scenarios.
Email/Password Authentication#
You do not have to configure anything in particular for this recipe. The backend and the frontend code already includes the initialization steps in each config files.
Custom UI
If you plan on using your own custom components for the UI you will have to use the supertokens-web-js library and manually call the authentication routes.
Use this demo app for a guideline on how everything on the backend should work and check our page that shows how authentication methods should look like on the frontend.
Session Management#
Besides all the authentication recipes that get initialized in the recipeList array, you might have noticed another call, Session.init().
This enables the session management functionalities that SuperTokens provides for your application.
To protect your backend routes, you will have to include the verifySession middleware in the route definition code.
The function limits endpoint access only to authenticated requests. It will also add the session object in request argument. We expose a SessionRequest interface so that you can work with proper types in your handler.
On the frontend the SessionAuth component can be used as a wrapper over routes that require authentication. If a user has not logged in, they will automatically
get redirected to the public sign in page.
SuperTokens Core Setup#
In our example app we used try.supertokens.com to host the example app. You can replace the endpoint with your the correct one based on your configuration.
If you want to use our managed service, check this guide on how to sign up and create your environment. Otherwise, for self-hosted instances, you can follow either the Docker guide or the other instructions, for non-docker scenarios.
 Pre built UI